Introduction: The Benefits of Machine Knitting Socks
Machine knitting offers a fantastic way to create folded-hem socks with speed, precision, and professional-quality results. Unlike hand knitting, a knitting machine allows you to quickly correct mistakes or modify patterns on the fly, saving valuable time. This flexibility also means you can experiment with different yarns and combinations without worrying about long hours of rework. Whether you’re making socks for yourself or as gifts, machine knitting ensures a consistent, snug fit with beautiful, polished finishes in a fraction of the time.
Yarn & Gauge
For this project, we’re using lace wool yarn with the following gauge:
Knitting machine: KnitKing Compuknit IV
Yarn Tension: 7
Stitches per inch: 8
Rows per inch: 11
Foot Measurements
Before we start, here are the foot measurements we’ll be working with:
Foot length: 9.5”
Distance from ankle bone to big toe joint: 6.5”
Ankle circumference: 8” at the narrowest point
Since socks need to fit snugly, the pattern includes negative ease, meaning the sock is knitted slightly smaller than the foot. Wool’s natural elasticity ensures a comfortable stretch.
Creating a Snug Fit
The cuff is designed to fit securely around the ankle to prevent slipping.
The ankle circumference with negative ease is 6.75”, ensuring a snug but comfortable fit.
Use yarn tension 7 for the cuff portion of the sock.
Step 1: Knitting the Folded Hem on the Ankle
Cast on 62 stitches using waste yarn using open cast on method.
Knit about two inches.
Remove the waste yarn from the carriage.
Insert the working yarn and knit 56 rows at tension 7.
Fold the hem to create a smooth edge.
Step 2: Shaping the Ankle to Heel Band
The bridge of the foot is the widest part, so we need to increase number of stitches for a comfortable fit.
Reset row count to 0 (RC=0);
Keep tension at 7and knit 4 rows;
RC=4:increase 2 stitches, one one each end, and knit 4 rows;
RC=8: increase 2 stitches and knit 4 rows;
RC=12: increase 2 stitches and knit 4 rows;
RC-16: increase 2 stitches and knit 4 rows;
In total, you have knitted 20 rows with 8 increases.
Now we have a total of 70 stitches (35 on each side of zero).
Step 3: Knitting the Heel with Short Rows
To shape the heel:
With the carriage on the right, move half of the needles to the left of zero to the E (non-working) position.
Set the cam lever to H position (this ensures only the working needles are knitted).
Decrease stitches as follows:
Move the first needle opposite the carriage to E position.
Wrap the yarn under the first needle to avoid holes.
Continue until 11 stitches remain in the center.
Attach claw weights to stretch the curled fabric. Otherwise, the stitches can easily fall off the needles.
Start increasing stitches, by bringing the innermost needle on the opposite side of the carriage back to the working position one at a time, until all needles are back in place.
You don’t need to wrap the yarn around the needle this time.
The heel should now have a natural curve.
Step 4: Knitting the Bridge of the Foot
Reset your row counter to zero.
All needles are in working position.
You can keep the cam lever in H position. All needles will be knitted because they are in working position.
Knit 8 rows
RC=8: Decrease 2 stitches (one on each side) and knit 8 rows;
RC=16: Decrease 2 stitches and knit 8 rows;
RC=24: Decrease 2 stitches and knit 8 rows;
RC=32: Decrease 2 stitches.
Now, you have 62 stitches (31 on each side).
Continue knitting without decreases until the row counter reaches 44 rows.
This section covers the distance from the ankle bone to the toe box with negative ease, ensuring a snug fit.
Step 5: Shaping the Toe Box
The toe box is knitted similarly to the heel:
Move left-side needles to E position.
Make sure the cam lever is in H position.
Work short rows until 11 stitches remain.
Begin increasing, moving one needle at a time back to the working position.
When all stitches are back in place, knit one half-row to bring the yarn to the center.
Cut the yarn, leaving a long tail (3x the width of the sock) for stitching.
Insert waste yarn and knit a few rows at tension 7 or 8 to secure the work.
Step 6: Stitching the Sock
Now it’s time to seam the sock together:
Use Kitchener stitch for the toe box for an invisible finish.
Use mattress stitch to seam up the length of the sock, including the folded hem.
Right Sock vs. Left Sock
Since the socks are knitted flat on a machine, they need to be stitched together. To create a mirror image for each foot:
Ensure the seam runs along the inside of the foot for a polished look.
Adjust your starting position so the left and right socks are symmetrical.
When knitting short rows, work the increases and decreases on the right side of zero for the left foot and left side of zero for the right foot.
Final Thoughts
Congratulations! You’ve just knitted a beautifully crafted wool sock with a perfect fit. This technique ensures warmth, comfort, and a professional finish. Happy knitting!
A wide, rolled-up bundle of carded fleece that unrolls into a blanket.
Bench
A table of the spinning wheel on which the wheel and spinning mechanism are mounted
Bulk
Wool’s filling power or “bounce” is the volume occupied by wool fibers. It can be applied to loose wools, slivers, or yarn and is expressed as cm3/g measured in a bulk-o-meter (bulk meter). Loose wools can range from 20 to 35 cm3/g with the values for sliver and yarn being progressively lower.
Butt-end
The end that was cut in shearing the sheep.
Carding
From Latin Carduus, meaning thistle or teasel. It is a process of disentangling and aligning fleece fibers. A hand carder or a drum carder is used.
Draft
Pulling out of fibers to allow only a certain amount of the fiber to twist into thread
Drafting triangle
Fanned-out fibers forming a triangle between an active hand and a passive hand in spinning.
Draw
A technique of pulling out fibers in the spinning process. The technique includes long draw and short draw.
Drive band
A cord carrying the power from the large wheel to the spindle or bobbin/pulley
Drop spindle
A stick with a weighted whorl that is used to twist fibers into thread (aka hand spindle).
Drum carder
A drum-like tool that cards fibers for spinning.
Fleece
Raw wool shorn from a wool animal, such as goat, sheep, vicuna, etc. before being processed into yarn.
Grease wool
Unwashed wool as it comes off of a sheep.
Grist
Yarn property that describes the relationship between yarn’s weight and its length. Grist is expressed in units of length per unit of weight. (Eg. 10 yards per ounce or 160 yards per pound.)
Hand carder
A tool used to hand-card fleece (a process similar to brushing). It is typically a large paddle set with 1/4 inch (0.6 cm) curved metal tines.
Hank
A coil or skein of yarn. A measurement of the length per unit mass of cloth or yarn, which varies according to the type being measured. A hank of worsted wool is 560 yards long (560 yd/lb = 1.129 km/kg).
Hogget
A yearling sheep (Brit.). A lamb between weaning and first shearing (NZ).
Kemp
Kemp is generally a chalky-white, brittle, weak fiber that may be mixed with normal fibers in a sheep’s wool fleece. Kemp fibers are often detached from the skin. This hair is not desirable in a fleece, as it does not accept dye, minimizing both the quality and the value of the wool.
Knot
A 40-yard strand skein of yarn wound on a reel or a niddy-noddy that measures 2 yards in circumference = 80 yards.
Leader
A piece of yarn afixed to the shaft of a bobbin to start spinning new yarn.
Niddy-noddy
A universal folk name describing a double-headed tool used to skein spun yarn. The implement was called a hand reel in Colonial days.
Noil
Large clumps of tangled wool and knots combed out of wool fiber before spinning.
Quill
A weaver’s spindle.
Rolag
A roll of fiber generally used to spin woolen yarn. A rolag is created by first carding the fiber and then gently rolling the fiber off the cards. If properly prepared, a rolag will be uniform in width, distributing the fibers evenly.
Roving
Fiber is carded or combed into a long continuous cord that is 2″-3″ thick. The fibers are going in multiple directions (but generally more aligned than a rolag or batt). This preparation of fiber is best suited to woolen spinning.
S-twist
Yarn spun with a counterclockwise twist. It looks like the letter “S”.
Scour
A synonym for washing used in the textile industry, especially in the sense of getting something thoroughly clean.
Skein
A length of yarn or thread that has been loosely coiled and knotted.
Skeining
Winding the thread off the spindle.
Skirting
The process of removing junk wool, stains, second cuts, and vegetable matter (VM) from the wool fleece prior to processing or offering for sale.
Sliver
Long strips of fiber created by carding or combing and drawing into long strips. Sliver is a thinner version of roving.
Slubs
Thick and thin areas in spun yarn.
Spinning count
A measure of wool diameter developed in England. It is defined as the number of hanks of yarn that can be spun from a pound of a clean wool top.
Staple
Length of a lock of fleece or a single fiber.
Strick
A bundle of flax prepared for spinning after the tow has been removed (long fibers only).
Suint
(Pronounced Soo-INT). Concentrated sheep sweat. It consists largely of potassium-based salts of fatty acids, combined with sulfate, phosphate, and nitrogen compounds. The “grease” part is a form of wax. In the trade, this stuff is referred to as wool fat. As extracted from the scouring process, it is called degras, and in a refined form comes to market as lanolin.
Top
Fiber is combed to provide spinning fiber in which all the fibers are parallel. This preparation of fiber is best suited to worsted or semi-worsted spinning.
Tow
Short fibers, which are left after the flax is combed out.
Woolen
A yarn spun from a rolag using a long draw technique. Woolen yarn is soft, light, stretchy, and full of air as opposed to worsted yarn which is strong, dense, and sleek.
Worsted
1. A technique that involves spinning long parallel fibers all aligned in the same direction from the butt-end to the tip. A short draw is used to spin worsted wool. The contrasting technique is woolen. 2. A particular weight of yarn that produces a gauge of 16-20 stitches per 4 inches of stockinette, and is best knitted with 4.5mm to 5.5mm needles (US size 7-9).
Wuzzing
Spinning out the water when washing, scouring, and rinsing fleece or yarn. It operates on the same principle as the spin cycle on a washing machine.
Z-twist
The yarn spun with a clockwise twist. It looks like the letter “Z”.
A chart of knitting needle sizes in millimeters and their corresponding codes used in the US, UK, and Canada.
If you are not sure what size needle should be used for your yarn, this rule of thumb may help: choose needle diameter that is twice the diameter of your yarn.
Alpaca clothing are made on different levels ranging from large fashion manufacturers to individual artisans. Every process of turning Alpaca wool into fabric or a knitted garment is essentially the same with some variations regardless of who makes it.
The steps in alpaca fleece transformation into clothing include
Sheering alpaca;
Skirting: the removal of debris from alpaca fleece;
Washing and dyeing fleece (dyeing is an option);
Picking clean alpaca fleece;
Carding or combing the fleece;
Spinning and plying alpaca fleece into yarn;
Washing yarn. (Dyeing can be done at this stage if the fleece wasn’t dyed earlier.)
Making knitted, woven, crocheted, or felted fabric and clothes from the yarn.
Washing fabric or garment. (And again, dyeing or printing can be done at this stage as well.)
Blocking fabric or garment.
These basic steps of turning alpaca fleece into a garment can have some variations depending on the clothing design and purpose. For example, the dyeing process may happen after washing the fleece or after spinning fleece into yarn. Alternatively, fabric or even the garment itself can be dyed or printed much later in this process.
Oftentimes, you can skip dyeing wool if you want to have natural colors. That’s what I did this time in my project. I selected my fleece based on the natural color of the animal itself. My project resulted in a very rich chestnut-brown piece.
Once a year, in early spring, farmers sheer their alpacas. The animals feel very good after this alpaca sheering. It’s like taking your pet to a groomer or going to a spa.
Removal of Debris from Dry Alpaca Fleece
Skirting and Cleaning Raw Alpaca Fleece
When a alpaca farmers sheer the animals they obtain so called raw fleece. Raw basically means that the fleece is in its virgin state before washing. This fleece has plenty of dust, debris from vegetation that the animals rub on, dirt or staining under the tail, grains or feed grass on the neck and chest areas, etc.
While the alpaca runs around happily from feeling light and liberated after sheering, the farmer does the dirty work of skirting. Skirting is manual removal of soiled and stained parts of the fleece. Typically, it’s the farmer, the family members, farm employees, seasonal or outsourced laborers, or any other helpers do this part of fleece cleaning.
I always imagined that skirting work is very tedious and monotonous. But, when I watched private small farmers do this work I was amazed how quickly and efficiently they go through one fleece after another.
Farmers’ goal in this process is to remove the smelly and unattractive stuff and large pieces of vegetation from the raw fleece to make it presentable on the market.
Drum-Cleaning Alpaca Fleece
The next step of this cleaning process is to remove as much dust, seeds, and vegetation from alpaca wool as possible. This process also takes place on the alpaca farm. A farmer places dry skirted alpaca fleece into a large drum. It’s a cylinder made of metal mesh. The drum spins just like clothes dryer with the alpaca wool inside. If you have seen a raw sheep fleece you know that it looks like a carpet. Alpaca fleece, on the other hand, looks like separated locks of wool. When it tumbles in the drum, small vegetation and dirt particles separate and fall through the metal mesh while the wool stays in the drum.
This is where the farmer’s work ends. Normally, farmers don’t wash their fleeces unless they also spin yarns and make clothing. A yarn spinner typically does the fleece laundry.
Purchasing Alpaca Fleeces
A spinner is a person who spins fleece into yarn. I buy my fleeces from farmers and go through the entire process of turning alpaca fleece into garments and other items.
I went to a small family owned and operated alpaca farm. Judy and Ron have a picturesque setup on grassy rolling hills with a pond in the middle. The farm hosts 23 alpacas that roam, play, and interact with curious visitors. When the visitors are not around, two vigilant Great Pyrenees dogs guard the fancy alpacas. Every alpaca has a name. And every bag of sheered fleece has the animal’s name on it so that the owner knows exactly the origin of any specific fleece.
So, I bought two fleeces from Ron and Judy and brought them to my Wool Barn to transform this natural beauty into something to wear for me and my family.
Below is the photo of the alpaca fleece that I bought from my friends. This fleece is sitting on a drying rack covered with a breathable burlap after all night of drying. I already washed this batch. Raw alpaca fleece looks almost exactly the same.
The Scouring Process
The next step in this alpaca wool journey is to wash the fleece or scour the fleece to be precise. Scouring is the process of washing raw fleece.
Scouring Sheep Fleece
I think that the reason for the word “scour” is that we use a very strong detergent to wash sheep fleeces. That’s because raw sheep wool contains lanolin. Lanolin is a wax that lubricates sheep’s coat and protects it from matting. Removing lanolin is not an easy process.
Scouring Alpaca Fleece
On the contrary, alpaca fleece does not have lanolin or any other fats. Raw alpaca fleece feels very dry to touch. But regardless, alpaca’s wool still needs washing from dirt and vegetation (vegetable matter or VM).
Some fiber artists combine fleece scouring with dyeing. By doing so, they eliminate an extra drying and re-wetting step and reducing the risk of felting. Any animal fibers should be washed with great care.
A combination of water, soap, and agitation can easily turn fleece into a felt. In fact, that’s one of the felting methods. A soapy wet fleece is evenly spread on a large table. This table has a lid made of a flat metal sheet of the same size and shape as the table top. If you turn the switch, this sandwich contraption starts to vibrate. The rubbing motion of the metal plates against each other felts the fleece into a felt fabric.
So when you wash wool, and it can be any wool, you always have to think about felting and how to avoid it. (The only exception is superwash wool, but we won’t talk about it in this post.) Each time you make your wool wet, you encounter a risk of felting.
In my case, however, I selected fleeces from a very deep red alpacas so that I could use their natural colors without having to dye my wool.
Picking and Carding alpaca Fleece
This is really like a wool spa. After washing and drying your fleece you want to align the individual fibers to prepare them for spinning. There are different tools for this depending on what you want to get in the end. The first step in separating the fibers is picking.
A picker is a tool that separates fibers without lining them up. The long box in the foreground of the picture below with nails sticking in two directions is the picker. The fleece on the right dry and clean alpaca fleece after scouring. The fluffy bunch on the left is the fleece of alpaca fibers after picking.
In the same picture above, the contraption with the belt behind the alpaca fleece is the drum carder. Carding will be the next step in preparing my alpaca fleece for spinning.
After I finished picking, a pile of alpaca fleece turned into quite a mount of fluffy fleece (below).
Carding Alpaca Fleece
Just like in pet grooming, you would brush your pets after giving them a bath. The same holds true with fleeces. The only difference is in the name. We call it carding. When you card wool, you feed small portions of fleece into the small drum of the drum carder and let the tool do its work.
The result after the first run may be still quite lumpy. If that’s the case, you need to repeat the carding until it looks smooth and lined up.
Preparing Alpaca Fleece for Woolen Spinning Method
If you take a close look at a carded alpaca wool, you will see that the fibers are not strictly parallel, but rather with some degree of freedom. That’s because I prepared my alpaca fleece for a so called woolen spinning method.
This blanket of carded fleece is called a batt.
At the end of the carding stage, I rolled the batts into wool burritos called rolags. We make rolags for the woolen type of spinning and top rovings for worsted spinning. I will describe the difference between woolen and worsted spinning in a different post. Please see the Glossary of Spinning Terms for definitions.
Washed and picked alpaca fleece in the background and the resulting rolags in the front.
I prepared my alpaca wool for spinning in woolen fashion for a very warm but delicate lace cowl.
Spinning Alpaca Fleece into Fiber
Alpaca yarn on the bobbin of the spinning wheel.
As you can see, when the fleece is fluffy, it looks light, but when it is condensed in a spun fiber it becomes very rich chestnut brown in color. After spinning yarn, I usually let it stay on the bobbin for 24 hours before removing it from the bobbin. The newly-spun yarn sets by the tension during this time.
Sometimes, I feel very inpatient when the yarn is setting that I want to keep working on it. But a day of rest is very important for the yarn quality. When the yarn was finally ready for plying, I double plied the treads with an intention of keeping my yarn very thin.
After plying, I transferred my two-ply yarn onto a niddy-noddy, washed and dried the yarn, and wound it into a ball with the yarn winder. You can see this section of the process in my earlier post, White-and-Blue Romney Wool Rugged Mittens.
Unlike the yarn in my mitten project, this 100% alpaca yarn is very fine as you can see it on the photo below. This lace-weight yarn is ready for knitting.
Knitting my Lace Cowl
The pattern for my cowl is very intricate. Usually, I don’t use commercial patterns. I design my own garments instead. Knitting this cowl was a laborious process. I used circular knitting needles for the body of the cowl. Then, I crocheted the border with a very fine wooden crochet hook made of Sorbus (Rowan or European Ash) tree.
I was very happy with my resulting project. See how happy I am in the photo below?
back post double crochet: Yo and draw up an lp around the post of the next st at the back of work 1 row below inserting the hook from right to left, (yo and draw through 2 lps on the hook) twice.
BPdtr
back post double treble crochet
BPhdc
back post half double crochet
BPsc
back post single crochet
BPtrc
back post treble crochet
BP
back post: crochet into the post inserting the hook at the back of the work.
beg
begin/beginning
bet
between
BO
bobble: Yo, insert hook into st and pull up an lp. Yo, pull through 2 lps. Rep first step in the same st/sp until you have a total of 6 loops on the hook. Yo, pull through all 6 lps at once. Sc in the next st.
cm
centimeters
ch
chain
ch-sp
chain space
CL
cluster
CA
color A
CB
color B
cont
continue/continuing
CC
contrasting color
x-st
cross stitch
dec
decrease/decreasing
dbl
double
dc2tog
double crochet 2 stitches together: Yo, insert the hook in the next st, yo, draw the yarn through the st, yo, draw the yarn through the first 2 lps on the hook, yo, insert the hook in the next st, yo, draw the yarn through the st, yo, draw the yarn through the first 2 lps on the hook, yo, draw the yarn through all 3 lps on the hook.
dc
double crochet: Yo, insert the hook in the st to be worked, yo, draw through the st, yo, draw through the first 2 lps on the hook, yo, draw through the rem 2 lps on the hook
dtr / dbl tr
double treble crochet: Yo the hook 3 times, insert the hook in the st to be worked, yo, draw the yarn through the st (yo and draw through 2 lps on the hook) 4 times.
ea
each
edc
extended double crochet
ehdc
extended half double crochet
esc
extended single crochet
foll
follow(s)/following
FPdc
from post double crochet: Yo and draw up an lp around the post of the next st at the front of the work 1 row below inserting the hook from right to left, (yo and draw through 2 lps on the hook) twice.
FL
front loop(s)
FLO
front loop(s) only
FP
front post
FPhdc
front post half double crochet
FPsc
front post single crochet
FPtr
front post treble crochet
FP
front post: crochet into the post inserting the hook from right to left at the front of the work.
g
gram(s)
grp
group
hdc2tog
half double crochet 2 stitches together
hdc
half double crochet: Yo, insert the hook in the next st to be worked, yo, draw the yarn through the st, yo, draw the yarn through all 3 lps on the hook.
hk
hook
“
inch(es)
incl
include/including
inc
increase/increases/increasing
lp(s)
loop(s)
MC
main color
m
marker
m
meter(s)
mm
millimeter(s)
oz
ounce(s)
patt
pattern(s)
pm
place marker
pc
popcorn stitch
prev
previous
ps/puff
puff stitch
ch-
refers to chain or space previously made; e.g., ch-1 sp
rem
remaining
rep
repeat
rev
reverse
rsc
reverse single crochet (aka the crab stitch)
RS
right side
rnd
round(s)
md(s)
round(s) (a derivative of rnd for rounds. Some fonts show “rn” as an “m”.)
sc2tog
single crochet 2 stitches together: Insert the hook in the next st, yo, draw the yarn through the st (2 lps rem on hook), insert the hook in the next st, yo, draw the yarn through the st (3 lps on hook), yo, draw the yarn through all 3 lps on the hook.
sc
single crochet: Insert the hook in the st, yo, draw the yarn through the st, yo, draw the yarn through 2 lps on the hook.
sk
skip
sm / sl m
slip marker
sl st
slip stitch
sp(s)
space(s)
st(s)
stitch(es)
TBL
through the back loop or turning back loop
TFL
through the front loop or turning the front loop.
tog
together
tr2tog
treble crochet 2 stitches together
tr
treble crochet: Yo twice, insert the hook in the next st to be worked, yo, draw the yarn through st (3 lps on hook), yo, draw through the first 2 lps on the hook, yo, draw through the rem 2 lps on the hook.
The table below encompasses the knitting abbreviations used by the US yarn industry designers and publishers. This is the industry platform or a backbone in a sense. Please use this as a foundation and build upon it.
Abbreviation
Description
alt
alternate
approx
approximately
byo
backward yarn over
beg
beginning
bet
between
BO
bind off
cn
cable needle
CO
cast on
cont
continue
CC
contrasting color
dec
decrease
dpn
double-pointed needles
foll
follow
inc
increase
k
knit
kfb
knit 1 into front and back of a stitch; single knit increase
ksp
knit 1 stitch, slip this stitch from right needle to left needle, pass second stitch on left needle over first stitch and off left needle; return stitch to right needle; single right-leaning decrease
k2tog
knit 2 stitches together; single right-leaning decrease
k1B
knit stitch in row below
kwise
knitwise
LH
left hand
lp
loop
MC
main color
M1lp
make one left purlwise; single left-leaning purl increase
M1L
make one left; single left-leaning knit increase
M1p
make one purlwise; single purl increase
M1rp
make one right purlwise; single right-leaning purl increase
M1R
make one right; single right-leaning knit increase
M1 or M1K
make one stitch knitwise; single knit increase
m
marker
p2sso
pass 2 slipped stitches over
psso
pass slipped stitch over
pat or patt
pattern
pm
place marker
prev
previous
p
purl
pfb
purl 1 into front and back of a stitch; single purl increase
p2tog
purl 2 stitches together; single decrease
pwise
purlwise
rem
remaining
rep
repeat
rev St st
reverse stockinette stitch
RH
right hand
RS
right side
rnd
round
sl
slip
sl1k
slip 1 knitwise
SKP
slip 1 knitwise, knit 1, pass slip stitch over knit stitch; single left-leaning decrease
slip 2 stitches as if to knit 2 together, knit 1, pass 2 slipped stitches over knit stitch; centered double decrease
ssk
slip 2 stitches knitwise, knit these 2 stitches together through back loops; single left-leaning decrease
ssp
slip 2 stitches knitwise, return these 2 stitches to left needle and purl them together through back loopsl; single left-leaning decrease
SSPP2
slip 2 stitches knitwise, return these 2 stitches to left needle and then slip them as if to p2tog through back loops, purl 1, pass 2 slipped stitches over purl stitch; centered double decrease
sssk
slip 3 stitches knitwise, knit these 3 stitches together through back loops; double left-leaning decrease
sssp
slip 3 stitches knitwise, return these 3 stitches to left needle and purl these 3 stitches together through back loops; double leftleaning decrease
In some cases, a regular e-wrap cast on can be difficult to handle on a flatbed knitting machine. A very large knitting project, for example, may consist of a long chain of e-loops. Attaching a long cast-on comb and the weights to a long row can be challenging when you have one or two very long rows to work with. To ease this task, a provisional anchor fabric comes to the rescue.
An anchor is a temporary piece of fabric made of waste yarn with the cast-on comb and the weights already attached to it. Affixing an e-wrap cast on to a temporary anchor gives you better control when starting a new knitting project. By doing this, you create a smooth transition from a temporary anchor fabric to the working yarn. This setup makes it easier for the carriage to perform its task, helps avoid potential flaws, and gives a uniform and professional look to the finished edge.
Let’s get started!
The Process:
Flatbed Knitting Machine Tutorial with Blue Cat
Step 1. Prepare a temporary anchor swatch with open cast on.
Let’s create a provisional anchor piece using some waste yarn from the stash. As mentioned before, an anchor is a knitted segment long enough to attach a cast on comb and the weights. It is used to pull the actual knitting down and make it easier for the machine to operate.
Set up the working needles and the carriage for an open cast on.
With the carriage on the right, push the needles into the working position (B).
To get started, let’s prepare the needles and the carriage for an open cast on. First, push about 30 needles into the working (B) position. Start with an empty carriage on the right* of the working needles.
* Starting with the carriage on the right side is easier for a right-handed person. If you are left-handed, you can place the carriage on the left and work in the direction opposite of what’s described in this tutorial. Or, you can follow the instructions and change the directions later.
Working needles are in the working position (position B).
Move the alternating needles to a non-working position (A).
Next, use the 1/1 needle pusher to move the alternating needles back to the non-working position (position A).
The alternate needles are in the non-working position (position A).
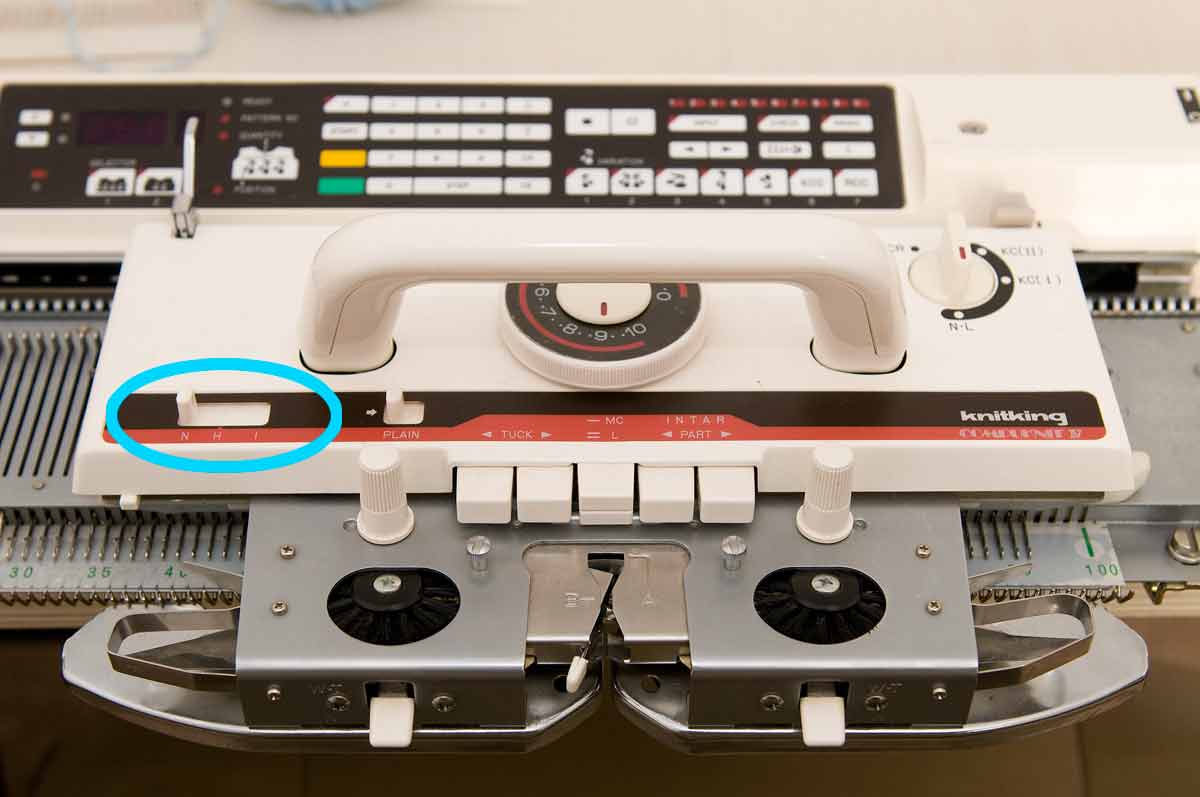
Set the holding cam lever in the normal position.
Now, let’s prepare the carriage. Make sure, the holding cam lever on the carriage is in the normal position (N for Brother/Knitking and a triangle for Singer/Studio machines.)
Marked with the blue ellipse, the holding cam lever is in N-Position (normal on Knitking machine).
Thread the yarn feeder and the carriage with waste yarn.
With the carriage on the right side of the working needles, thread the waste yarn through the carriage and lock the yarn by moving the yarn feeder lever to the right.
The waste yarn is threaded through the carriage with the yarn feeder lever locked.
Knit the anchor swatch.
Move the carriage to the left for an open cast on.
Now, the needles and the carriage are ready for an open cast on. To create an open cast on, move the carriage from right to left across the working needles. You can find the detailed description in Blue Cat Tutorial for an open cast on.
The first run of the carriage across the working needles creates an open cast on.
Place all needles in the working position (B).
Before you start knitting, push the needles that were in the non-working position (A) back to the working position (B). Use the blunt edge of the needle pusher on the needle butts.
All working needles are in the working position.
Attach cast-on comb to the loops, add claw weights if necessary.
At this point, we attach the cast-on comb to the loops while keeping the working yarn free (in front of the cast-on comb).
Attach the cast-on comb to the loops to create tension. The working yarn (tail on the left) is free. The carriage is on the left side (in the direction of the working yarn).
Knit several rows to make a provisional anchor.
Finally, we can knit several rows to produce the temporary piece of fabric. With the weights attached, this helper fabric works as an anchor for our future knitted creation.
Knit a few rows to create anchor fabric. Keep the cast-on comb and the claw weights attached.
Side Note: I realized that I used the photos from the Open Cast On tutorial using blue yarn. My anchor is actually made of brown yarn in this tutorial. And the blue yarn will be the permanent piece from this point. I will update the photos to avoid confusion in the future.
Disconnect the working yarn from the carriage.
First, you need to disconnect the working end of the waste yarn from the carriage and make sure that it hangs freely. You can attach the yarn to your claw weight to keep it from catching by the carriage.
Step 2. Attach the ravel cord
Remove the waste yarn from the yarn feeder and replace it with a ravel cord.
A ravel cord is a thin, sleek, and durable cable used to affix the permanent work to a temporary anchor. Nylon, silk, or linen can be used for this purpose. Thin mercerized cotton cord worked very well for this project.
Thread the ravel cord through the yarn feeder of the carriage.
Insert the ravel cord into the yarn feeder and lock it.
Knit one row.
Move the carriage from right to left to knit one row with the ravel cord. Only one row is necessary. The ravel cord holds the permanent work to the temporary anchor. The ravel cord will be pulled out later to disconnect the anchor.
Knit one row with the ravel cord.
Disconnect the ravel cord from the carriage.
After one pass, remove the ravel cord from the carriage.
Step 3. E-Wrap Cast On
Set up the working needles and the carriage for the permanent work piece.
Switch the cam lever to the holding position to move the empty carriage from left to right.
At this point, the empty carriage is on the left side of the working needles. You need to move the carriage to the right in preparation for the e-wrap. To do that, switch the cam lever to the holding position and move the needles into their holding position (E on Brother/Knitking, D on Singer/Studio) as shown in the photos below.
Switch holding cam lever to holing position to allow a free carriage pass.Move the needles in the holding position.
Move the carriage from left to right.
Switch the cam lever on the carriage to the normal position.
And now, switch the cam lever back to the normal position. Please see photo below.
Switch the holding cam lever in working (normal) position.
E-wrap the working needles from left to right. Both the ravel cord and the e-wrapped working yarn are on the needles.
Keep the needles in the holding position. It makes it easier to e-wrap the working yarn. In addition, it is easier for the carriage to perform its task at the first raw with the needles in the holding position.
With the carriage on the right, e-wrap your working yarn starting on the left and ending on the right side next to the carriage.
Thread the working yarn through the yarn feeder.
Feed the working yarn into the yarn feeder of the carriage. When you e-wrap the yarn onto the needles, your ravel cord is still on the needles as well. So, you have two layers of loops on your working needles.
E-wrap cast on in front. The ravel cord loops are by the guard pegs.
Knit the work piece. The working fabric is attached to the anchor fabric by the ravel cord. The anchor fabric stabilizes the work.
Now, you can move the carriage from right to left to knit the first row of the actual work. Because the work is already attached to the anchor piece with tension applied to it by the cast-on comb and the weights, the passage by the carriage is very smooth and easy. You can continue knitting your workpiece until it’s done.
The photo below shows the brown anchor piece with a cast-on comb attached and the actual work in blue yarn. The white ravel cord connecting the two is not seen very well, but it’s there.
The blue fabric is the actual work.
For the purpose of this tutorial, I removed the work from the machine and bound it off by hand. I blocked the fabric to keep it from curling. You can easily see the anchor fabric on the bottom, the white ravel cord in the middle, and the actual work fabric in blue.
The prop fabric (brown) was used to support the weights. The ravel cord (white) connects the work fabric (blue) to the supporting anchor fabric.
Side Note:
For some reason, these colors and textures made me think of a corn field with the blue sky in the background.
Hm 🙂
Remove the ravel cord to disconnect the permanent part from the anchor.
The ravel cord can be pulled or cut to free your work.
Cut the or pull the ravel cord to separate the anchor fabric from the main work.
In the photo below, you can compare the cast-off (top) done by hand with the e-wrap cast on (bottom). The manual cast-off looks like a braid while the e-wrap cast on looks like a rope. Both look very nice.
E-wrap edge is on the bottom. See how sharp and crisp it is compared to the bind off on the top.
Below is another view of the e-wrap cast on.
E-wrap cast on with an anchor.
This is the end of our tutorial for e-wrap cast on with an anchor on a flatbed knitting machine.
In machine knitting, e-wrap cast on (aka e-loop) is a type of cast on in which yarn is wrapped around each needle counterclockwise forming loops that are shaped like a lower-case cursive letter “e”.
Unlike open cast on, it gives a secured finished edge to your knitting. E-wrap cast on stands on its own and it gives a neat border to the garment. How to cast on a finished edge using the e-wrap method on a flatbed knitting machine?
Follow this tutorial for step-by-step instructions with photos. Or, see the outline above for a quick review.
Let’s get started by setting up the knitting machine.
The Process:
Step 1. Prepare knitting machine settings for e-wrap cast on.
Before we begin the e-wrap cast on, we need to make sure the knitting machine settings are correct.
Set the working needles to the holding position.
Push the working needles into the holding position (HP). (D-position on Knitmaster, Empisal, Silver, Singer, and Studio; and E-position on Knitking and the modern Brother.) These needles, however, should be engaged in knitting, and not just holding. To accomplish that, make sure the carriage settings are correct.
Blue Cat pushed the working needles all the way out to the holding position.
Set the cam lever on the carriage to the normal position.
Switch the holding cam lever to the normal position to ensure that the machine operates the needles as working and not holding needles. (The cam lever setting is N in Brother/Knitking, triangle in Singer/Studio machines).
Marked with the blue ellipse, the holding cam lever is in N-Position (normal on Knitking machine).Holding cam lever in N-position.
Side note: If you set the lever to the holding position and push out the needles to the holding position, and then move the carriage across the needles (in either direction), the machine will not move these needles back to the working position (B-position).
You can test your machine for the correct settings. Push a few needles all the way out to the holding position. Then change the lever, and move the carriage from side to side across the needles. If the needles will stay in the same holding position, the cam lever is not set correctly. If the needles move to a working position, it means that the carriage is set to a working position. You need the working setting.
Blue Cat checks the setting.
Place the carriage on the opposite side from the starting needle of the e-wrap. The right side is most commonly used.
The carriage can be on either side of the needles. But it should be on the opposite side from the starting needle.
E-wrap begins with the needle furthest from the carriage and moves towards the carriage. If the carriage is on the right, the e-wrap begins on the left and ends on the right. This is easier for a right-handed person. If you place the carriage to the left of the needles, you need to e-wrap the needles from right to left with the working thread facing the carriage.
For the sake of this exercise, park the carriage on the right of the needles.
The carriage is on the right of the needles.
Run a test pass.
Pass the carriage from right to left to make sure the working needles move from the holding to the working position.
Test pass of the carriage from right to left. The carriage moves the needles to the working position.
Now, repeat the test from left to right. Push the needles back to the holding position and run the carriage to the right (back to its original place). The test run should set the needles from the holding to the working position again.
The needles are set in the holding position (all the way out) again to repeat the test in the opposite direction.Test run has set the needles back to the working position.
Now, that the machine is set, we can start e-wrapping the needles.
Step 2. E-wrap the working needles starting with a slip knot on the furthest needle from the carriage
Begin with a slip knot the size of an individual loop.
The first loop is a slip knot starting on the left when the carriage is to the right of the working needles.
The yarn is wrapped counterclockwise around the next needle to the right, forming a small cursive letter “e”.The yarn is wrapped counterclockwise around the next needle to the right, forming a small cursive letter “e”.Continue wrapping each needle keeping the tension low and even.All working needles are e-wrapped in this photo.
The tension of the e-loops should be not too tight, but not too loose either. If it’s too tight, the machine may have difficulty knitting these loops. If the tension is too loose, the edge of your work will look uneven and messy. It may take some practice to achieve the right tension.
To avoid too much tension of the working yarn when you are making the loops, you can slip the yarn through the clip of the tension unit as shown in the photo below.
I pinched the yarn in the clip to keep it loose.Blue Cat check: All working needles are e-wrapped from left to right with relatively loose and equal tension. The needles are in the holding position. The loops are pushed all the way back. The carriage is on the right.The e-loops are pushed all the way back on the working needles.
Step 3. Thread the carriage with the working yarn.
The next step is to take the working yarn and thread it through the carriage as shown in the photos below.
The working yarn is threaded through the carriage. It is still loose in this photo.Weeee! Blue Cat is demonstrating how the working yarn is threaded.
Step 4. Move the carriage from right to left.
The carriage is on the move from right to left.The first row is made. The purl side of the work is facing you.
Step 5. Attach the cast-on comb and the weights to the first row of stitches.
At this point, you can attach the cast-on comb and weights to the newly-made stitches. But, you may find it a little difficult to do so because there isn’t enough length of the knitted fabric. To make it easier, you can run the carriage from left to right to gain more length.
To make sure that the machine knits properly without the weights, it’s best to push the working needles all the way out to the holding position again. The stitches (loops) should be pushed all the way back.
I push a few needles at a time while using my left hand to keep the stitches in the back.All working needles are out in the holding position now with all stitches in the back as far as they can go.
Move the carriage across the working needles once or twice more. When the fabric is long enough, you can attach the cast-on comb and the weights.
The cast-on combs and the weights are attached.
Step 6. Knit your project.
You can knit your project now.
The photo below shows the e-wrap border. It’s the top border of this small knitting project. When you knit on the machine, the e-wrap border is at the bottom of your work. I turned it upside-down for a better view. The opposite edge has free loops.
The top border is made using the e-wrap method.Blue Cat check
Open cast on is the type of cast on that produces unfastened stitches that will unravel whenever possible. This type of stitch is also known as live or open stitch. Open cast on is also known as provisional or invisible cast on.
The Uses of an Open Cast On.
So, open, invisible, or provisional cast on creates live or open stitches. This cast on has many uses.
What is the purpose of an open cast on?
It provides an invisible seam
After you are done knitting one part of your project with an open cast on, you then bind it off. Next, you can load the live stitches back onto the machine with the knitting turned upside-down. The intent is to start knitting in the opposite direction. Thus, you create an invisible seam with an intriguing pattern radiating in two directions.
By doing that, you can knit a scarf in two directions starting from the middle. Or, you can make anything that folds. For example, a stocking cap or socks, a bag or purse, toys, a double-knit fabric, and so on.
You can also use these open stitches to hem a garment using a ribbing machine or by hand.
It allows making a disposable anchor
An anchor is a piece of provisional fabric knitted from waste yarn. And it is used to attach permanent yarn. Later, the anchor is removed to give a very neat and professional appeal to the remaining edge.
It saves time for making a temporary sample swatch
One example is making a new pattern and needing to calculate the number of stitches and rows for the size. Another example is when you are unsure if you have enough yarn for a project. In both cases, you can quickly load the needles with an open cast on. Then, knit a sample swatch and cast it off. After you block it you can measure the resulting piece.
These are just a few applications of the provisional cast on. I am sure, you can come up with many other creative uses!
So, how do you do an open cast on? Let’s get started.
The Process:
This tutorial explains step by step how to do an open cast on. Use the outline above if you know how to do it and only need to review the method. It recaps every step of the process. You can click on each step to see the detailed explanation and photos.
Do you want to see the entire process? Then, read on!
Step 1. Prepare the tension unit.
Thread the yarn through the tension unit.
Thread the yarn according to your machine user manual. The diagram below demonstrates the steps for my Knitking machine. Knitking is very similar to Brother.
Thread the yarn through the rear yarn guide.
Pass it between the disks from the back.
Thread through the front yarn guide.
Thread into the take-up spring eyelet.
Clip it in the yarn clip.
Diagram for threading yarn on Knitking machine
Adjust tension for yarn thickness.
Usually, the tension is higher for thick yarn and lower for fine yarn. The medium-weight yarn tension is somewhere in the middle. Adjust the yarn tension. Please refer to your machine manual for guidance.
The yarn tension unit is loaded. And the tension is set. Doesn’t it look elegant?
Upon setting the tension, you need to prepare the needles for an open cast on.
Step 2. Prepare the needles for an open cast on.
A Technical Note about Needles and their Positions (for Beginners).
The Needles . . .
A knitting machine needle has five parts: hook, latch, stem, butt, and shank (please see the diagram below).
Knitting machine needle diagram.
The folded knobs you see closer to the middle of the photo below are the butts. You will be using them to push the needles into their positions. It will become more clear very soon.
The needle butts are used for repositioning the needles.
. . . and the needle positions
Modern knitting machines have four positions:
Non-working position (NWP) does not knit.
Working position (WP) knits stocking stitch.
Upper working position (UWP) is used for patterns.
Holding position (HP) does not knit when the holding lever is on.
Different models used different letter denominations for the positions.
Knitmaster, Empisal, Silver, Singer, and Studio, use A, B, C, D, respectively.
Brother (KH830 and higher) and Knitking use A, B, D, and E, respectively.
Only two positions are used for an open cast on — working and non-working positions.
Move selected needles to the working position (B) and align them using the carriage.
Chose approximately 30 needles to use for knitting your practice swatch. They are referred to as working needles. Use the flat side of the needle pusher and the needle butts to move them one step forward into the working position.
The holding cam lever on the carriage is in the normal position (N on Brother/Knitking or triangle on Singer/Studio).
Marked with a blue ellipse, the holding cam lever is in the normal position.Close-up of the holding cam lever in normal position (N).
Next, run the carriage across the needles a couple of times to align them. The position of the carriage relative to the needles is not important at this point. It can be on the right or left side of the working needles.
The needles are aligned in the working position with the K-carriage on the left.
Move the alternating needles back to the non-working position with a 1/1 needle pusher.
The next step is to move every other needle back to the non-working position (A).
A 1/1 needle pusher is used to push every other needle back into the working position.
Blue Cat is holding the needle pusher to demonstrate how it moves the needles.
Blue Cat is helping move the alternating needles back to non-working position.
The picture below shows the selected needles alternating between the working (B) and non-working (A) positions.
Position A is a holding place for the needles. Needles in this position (in the back) will not be involved in the knitting process. B-position is the working position (in front).
Align the needles by moving the carriage with the holding cam lever in the normal position. Leave the carriage on the right.
At this point, the needles are in place and the holding cam lever stays in the normal position. The next step is to move the carriage across the needles a few times. This time, you need to park the carriage on the right of the working needles.
Step 3. Prepare the carriage for the open cast on.
The carriage and the needles are in position for the cast on. The cam lever is in the normal position. The final step is to thread the carriage.
Thread the yarn through yarn feeder A of the carriage
Now you will need to thread the yarn through the carriage. It is the carriage used for a stocking stitch.
How to thread the yarn through the feeder of the carriage (for Beginners).
Open the yarn feeder of the carriage by pushing the lever to the left.
Remove the yarn from the yarn clip on the tension unit.
Take the yarn through the yarn feeder A of the carriage.
Move the lever back to close the yarn feeder while holding the yarn in the left hand.
Voila! You are ready! But don’t let go of the yarn just yet!
Carriage is prepared for knitting.
Step 4. Cast the yarn on the needles using an open cast on.
Move the carriage from right to left until you hear a click.
Still holding the yarn with your left hand, move the carriage from right to left across all working needles. You can let go of the yarn when you feel the needles catch it.
After the carriage has been moved to the left, the needles in the working position should have the yarn wrapped around them as shown in the photo below.
The yarn is hooked on the needles in a working position (B). The alternating needles are still in the non-working position (A).
This is what it looks like from a different angle:
Step 5. Prepare needles for knitting.
Attach a cast-on comb to the loops.
Now, we use a cast-on comb to add tension to the loops.
Blue Cat introducing the cast-on comb.
I chose the short cast-on comb for this small exercise.
I am using a short cast-on comb for this small project.
Hook the cast-on comb over the loops and pull it down lightly.
Cast-on comb is attached to the loops.
Make sure that the working yarn connected to the carriage (on the left) is not attached to the cast-on comb.
The working yarn on the left is free.
You should be able to pull the working yarn toward you as shown in the photo below.
The working yarn can be pulled forward easily.
Push the remaining needles from the non-working to the working position.
There is one more step to take before the machine is prepared for knitting. Now, we need to use the flat side of the needle pusher to return the needles from position A back to position B.
All working needles are in working position now (position B). You are ready to move the carriage from left to right.
Step 6. Move the carriage from left to right and continue knitting.
Move the carriage to the right clearing the knitting before you move it back in the other direction. You will hear a clicking sound at the end of each row.
The first row is made with the carriage on the right side.
Now, we are ready to knit our project. Move the carriage back and forth making sure that the carriage clears the rows. But don’t move the carriage too far passed the knitting.
Step 7. Remove the knitting while holding the cast-on comb.
After a few rows are knitted, you will see the purl side of the project facing you. You can remove your knitting when you are satisfied with the number of rows you’ve made. This is called cast-off.
To cast off, remove the yarn from the yarn feeder A of the carriage. Push the yarn feeder lever to the left and move the yarn downward. And finally, move the empty carriage over the work to the other side.* When you do that, your knitting piece will disconnect from the needles.
*Important: To prevent your knitting from falling, make sure that you hold the cast-on comb as you move the carriage.
The carriage is empty. You can remove your work from the machine.The working yarn is not in the carriage. The empty carriage is ready to move to the left and disconnect the practice swatch.
Congratulations! You have completed the Open Cast On Tutorial!